

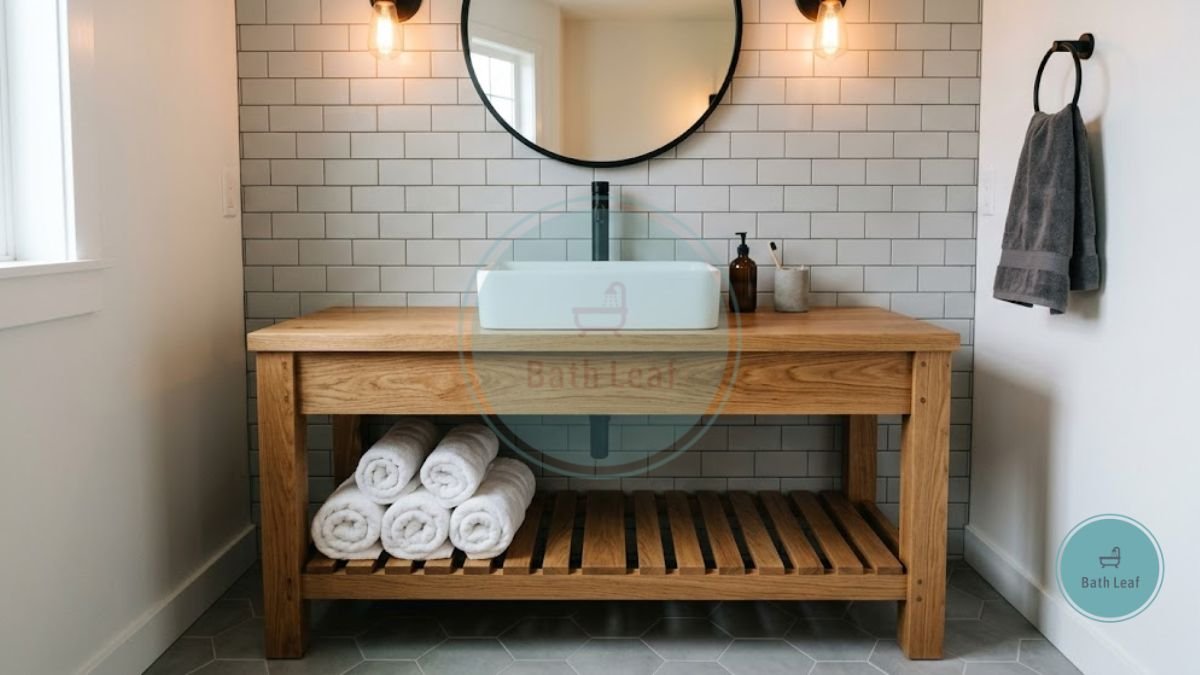
Finding a store-bought vanity that fits precise plumbing dimensions while matching your specific style preferences often feels frustrating and unnecessarily expensive. However, constructing a DIY wood vanity for your bathroom allows you to customize storage, choose durable hardwoods, and achieve a high-end furniture look on a modest budget. By mastering basic pocket-hole joinery and applying marine-grade sealants, you can build a custom wooden sink cabinet over a single weekend.
Quick Summary:
• Style Vibe: Warm, organic, and custom-crafted with exposed wood grain and structural joinery.
• Key Focus: Building a water-resistant timber frame tailored to your exact plumbing layout.
• Estimated Investment: $150 – $350
• Best For: Homeowners and renters looking for custom storage and authentic wood character.
Project Breakdown
- Estimated Cost: $150 – $350
- Time Required: Weekend Project (6–10 Hours)
- Skill Level: Intermediate DIY
- Key Materials Needed: Solid oak or pine lumber, pocket-hole screws, waterproof wood glue, marine-grade polyurethane, ceramic vessel sink, mounting hardware.
Top Picks for Quick Shopping
| Category | Recommended Pick | Key Advantage | Ideal Space |
| Joinery Tool | Kreg Pocket-Hole Jig System | Creates hidden structural joints quickly without visible nail heads | Woodworking workshops |
| Protective Finish | Varathane Ultimate Water-Based Polyurethane | Provides crystal-clear waterproof protection that resists steam yellowing | Raw timber surfaces |
| Sink Fixture | Modern Rectangular White Ceramic Vessel Sink | Sits directly on top of wood counters to simplify plumbing cuts | Custom vanity tops |
Read Also: Minimalist Bath Makeover: 5 Easy Steps to a Clean Space
5 Steps to Build a DIY Wood Vanity for Your Bathroom
Building custom furniture requires strategic preparation so your timber withstands high humidity levels for years. Consequently, these five practical steps will guide you through assembling a sturdy, water-resistant cabinet.
Step 1: Select and Dimension Water-Resistant Hardwood Lumber
Choosing raw lumber is the most critical decision when starting your DIY wood vanity for your bathroom. Because bathrooms endure frequent humidity spikes from daily showers, selecting stable, low-moisture timber prevents warping.
For example, hardwoods such as white oak, teak, or walnut offer natural moisture resistance and superior structural density. However, if you choose budget-friendly kiln-dried pine, you must inspect boards for straightness before cutting. Subsequently, cut your vertical legs from 2×2-inch square stock and frame rails from 1×4-inch lumber using a miter saw.
Step 2: Construct the Rigid Frame Using Pocket-Hole Joinery
Visible screw heads weaken the refined look of handmade wooden furniture. Therefore, utilizing hidden pocket-hole joinery creates clean, strong joints across your cabinet frame.
First, drill two pocket holes into both ends of your horizontal 1×4-inch apron rails using a pocket-hole jig. Second, apply a thin line of waterproof wood glue along the joint seams before driving 1-1/4-inch pocket-hole screws home. Consequently, clamping the joints tightly while driving screws prevents the frame from twisting out of square.
Step 3: Fit Lower Slatted Storage Shelves and Drainage Cutouts
Open slatted lower shelves provide essential towel storage while allowing air to circulate freely beneath the sink. For this reason, installing slatted timber shelves maximizes functional storage without adding visual bulk.
Specifically, space 1×2-inch timber slats roughly half an inch apart across the lower horizontal frame supports. Furthermore, measure your drain pipe location carefully before securing the top counter board. As a result, cutting a precise 3-inch hole for the pop-up drain assembly ensures your plumbing drops cleanly through the wood without structural interference.
Step 4: Apply a Marine-Grade Waterproof Polyurethane Sealant
Raw wood absorbs ambient water vapor rapidly, which leads to wood swelling and mold growth if left untreated. Thus, applying a high-grade waterproof topcoat is the most vital step of this entire build.
First, sand all assembled wood surfaces thoroughly using 120-grit sandpaper, followed by 220-grit paper to smooth down raised wood fibers. Second, apply three thin coats of clear water-based polyurethane using a fine synthetic brush. Furthermore, sand lightly between coats using 320-grit sandpaper to remove dust nibs, ensuring you seal the underside of the counter where steam accumulates.
Step 5: Mount the Vessel Sink, Plumbing, and Hardware
Installing a vessel sink simplifies this woodworking project because it eliminates the need for complex undermount sink cutouts. Consequently, mounting your sink basin on top preserves valuable internal cabinet space.
Position your ceramic vessel sink directly over the pre-drilled drain hole, applying a bead of 100% silicone sealant around the bottom rim. Next, attach your high-rise vessel faucet using flexible braided supply lines. Finally, attach matte black cabinet pulls or side towel bars to complete your custom vanity build.
Curated Product Spotlights
Spotlight: Kreg Pocket-Hole Jig System
- Category: Woodworking Tools
- Why It Works: Drills precise angled pilot holes that hide fasteners inside joint seams for a professional furniture finish.
- Pro-Placement Tip: Set the drill guide stop collar to match the exact 3/4-inch thickness of your framing lumber.
- Best Feature: Hardened-steel drill guides backed by a lifetime warranty.
Spotlight: Varathane Ultimate Water-Based Polyurethane
- Category: Wood Stains & Sealants
- Why It Works: Forms a clear, scratch-resistant waterproof barrier that protects raw timber against steam and standing water.
- Pro-Placement Tip: Apply three light coats with a synthetic bristle brush rather than one heavy coat to prevent drip marks.
- Best Feature: Non-yellowing formula that dries to the touch in under two hours.
Spotlight: Modern Rectangular White Ceramic Vessel Sink
- Category: Plumbing Fixtures
- Why It Works: Rest on top of wooden vanity counters, requiring only a simple 3-inch drain hole cut.
- Pro-Placement Tip: Apply a neat bead of clear kitchen and bath silicone around the base perimeter to lock it against the wood.
- Best Feature: Smooth vitreous china glaze that resists scratching and stains.
Spotlight: Heavy-Duty Matte Black Towel Bar Hardware
- Category: Fixtures & Hardware
- Why It Works: Mounts directly to the side wooden apron of your vanity, keeping hand towels accessible beside the basin.
- Pro-Placement Tip: Pre-drill pilot holes into the wood frame before driving mounting screws to prevent timber splitting.
- Best Feature: Solid zinc alloy construction with a rust-resistant matte black powder coat.
Common Mistakes to Avoid
- Neglecting to Seal the Underside of Wood Counters: Sealing only the top surface allows moisture to enter from below, causing the wood to cup or warp over time. Therefore, always apply equal coats of polyurethane to all six sides of every wooden board.
- Using Standard Interior Wood Glue: Standard PVA wood glue breaks down when exposed to constant moisture and steam. Instead, strictly use Type II or Type III water-resistant wood glue for frame assembly.
- Forgetting Plumbing Clearances: Building solid internal drawers without checking p-trap locations causes severe installation delays. Consequently, measure your wall pipe height before building interior shelves or drawer boxes.
Frequently Asked Questions
What is the best wood to use for a DIY bathroom vanity?
White oak, teak, and walnut are the best hardwoods due to their high density and natural water resistance. However, kiln-dried pine works well on a budget if sealed properly with marine-grade polyurethane.
How do I protect a wooden vanity top from water damage?
Apply at least three coats of clear water-based polyurethane or spar urethane to all wood surfaces. Additionally, wipe away standing water promptly and reapply a topcoat every two to three years.
Is a vessel sink better for a DIY wood vanity build?
Yes, vessel sinks are significantly easier for DIY builds because they require only a simple drain hole cutout. Undermount sinks require complex router templates and extensive internal waterproofing along exposed cut edges.
Summary & Action Plan
Building a DIY wood vanity for your bathroom is an empowering project that combines custom utility with timeless organic warmth. By selecting quality timber, utilizing strong pocket-hole joinery, applying marine-grade sealants, and mounting a vessel sink, you can construct a durable piece of furniture over a single weekend.
Weekend Action Checklist:
• Measure your bathroom plumbing location and sketch your vanity frame dimensions.
• Purchase kiln-dried timber, pocket-hole screws, and water-resistant wood glue.
• Cut frame components to length and assemble using a pocket-hole jig.
• Sand all surfaces thoroughly and apply three coats of waterproof polyurethane.
• Secure your ceramic vessel sink over the drain cutout with 100% silicone.